FORENSIC MEDICAL ASSESSMENT
When a patient presents to the emergency department and reports being sexually assaulted, medical treatment always takes precedence over evidence collection. All patients are first evaluated for pain, bleeding, and safety. The CDC also recommends baseline testing of patients who may have been sexually assaulted for sexually transmitted infections (STIs) and pregnancy. Any patient who reports being strangled or who has sustained a head injury should be seen by a physician prior to or while collecting evidence (U.S. DOJ, 2013; Texas A&M, 2019).
The forensic medical exam consists of obtaining the history; a physical assessment; and collection of potential biological, physical, or trace evidence.
Patient History
The nurse explains to the patient that the history is intended to document what happened in order to offer appropriate treatment and to determine what parts of the body to collect evidence from. For adolescent or adult patients, the examiner asks them to describe what happened from just before the sexual assault occurred to when they arrived at the facility. For prepubertal children, the nurse avoids extensive interviewing if not a trained sexual assault nurse examiner, specially trained medical forensic professional, or specially trained forensic physician.
DOCUMENTING EVIDENCE
Documentation in the medical forensic record is critical not only for victim care in the aftermath of sexual assault but also in the investigation of the crime and processing of any evidence collected during the exam (DOJ, 2017).
Findings are documented on whichever form has been adopted by the facility. Forms may be included in the SAEK or are downloadable from the Texas Evidence Collection Protocol (see “Resources”). It is not required to use state forms.
All evidence must be properly documented using verbal descriptors, diagrams, and photographs, as applicable. Documentation typically includes both a narrative and the use of a body chart, labeled appropriately. When documenting the history:
- Use the patient’s own words in quotation marks for greatest accuracy. If a patient uses a slang word, clarify the meaning. For example, the nurse might document, “The patient states, ‘He nutted in me,’” and then add, “The patient clarified that ‘nutted’ refers to ejaculation.”
- Avoid judgmental words. Documentation should avoid passive tense because the meaning may not be as clear to the reader. Also, do not include expressions such as “the patient alleges” or “the patient refuses” because they imply a nonobjective conclusion about what the patient has stated. Nonjudgmental documentation alternatives include “the patient states or reports” or “the patient declines.”
(Johnson, 2019; Sheridan, 2017)
Physical Assessment
The forensic medical assessment includes assessing and documenting any injuries that may have resulted from blunt or penetrative trauma, suction, bites, cuts, lacerations, abrasions, burns, bruises, or contusions. It is important to use the correct term when documenting findings. Common terms as described in the Texas Evidence Collection Protocol include:
- Abrasion: Scraping type of injury that is superficial damage to skin or mucous membrane
- Bruise: Bleeding beneath the surface of the skin; an accumulation of blood in the tissues outside of the blood vessels
- Contusion: A bruise (see above)
- Cut: An opening in the skin that occurs when a sharp object comes into contact with skin or tissues with enough pressure to divide it; not the same as a laceration or tear
- Laceration or tear: Injury that occurs when the skin is broken and disrupted by blunt force such as tearing, ripping, crushing, overstretching, pulling apart, over-bending, or shearing of tissue
- Petechiae: Multiple hemorrhagic spots, pinpoint to pinhead in size
- Scar: Fibrous tissue that replaces normal tissue after the healing of a wound
(James et al., 2014; Faugno et al., 2012; U.S. Army, 2017)
STRANGULATION
Strangulation is a medical emergency that requires physician evaluation prior to or during collection of forensic evidence. The following indicators constitute physical evidence of strangulation that should be documented and, if appropriate, photographed:
- Bruising, redness, swelling
- Shortness of breath, wheezing, sore throat, raspy voice
- Scratches on the neck
- Petechiae to conjunctiva, mouth, face, or neck (any area above the constriction)
- Bruising or petechiae behind the ear
- Loss of consciousness or memory of incident
- Loss of urine or stool
A victim of strangulation may have no external evidence of being strangled and may still develop life-threatening sequelae. Strangulation has been identified as a predictor of homicide in intimate partner relationships and is a red flag for healthcare professionals (Ketchmark, 2020).
Physical Evidence Collection
Physical evidence consists of articles that can be collected for analysis of a crime. Types of physical evidence may be:
- Biologic (e.g., blood, skin, hair, semen, saliva, vegetation)
- Trace evidence (e.g., fiber, glitter, glass, soil, sand, adhesive, gravel, oil)
- Gross (i.e., visible to the eye) (e.g., soil under the fingernails)
- Invisible (e.g., DNA on the skin surface)
Following are some important guidelines for the collection of physical evidence for forensic purposes:
- Bring all necessary equipment into the room before beginning the physical assessment.
- Always maintain Standard Precautions when obtaining biological evidence. This means always wearing personal protective equipment (PPE) such as gloves and gown (or clean lab coat) and a facemask and eye protection if there is any potential for droplet splatter.
- Treat all biological evidence as a biohazard to prevent possible exposure to HIV or other pathogens.
- Best practice is to use two swabs held together when swabbing each sample.
- Use a least-invasive to most-invasive procedure process.
(Texas A&M, 2019)
Detailed instructions and a flowsheet for both the Adult/Adolescent Assessment and Prepubertal Pediatric Assessment are found in the Texas Evidence Collection Protocol (see “Resources” at the end of this course). The table below provides a summary.
| Items | Collection Procedure |
|---|---|
| (Adapted from Texas A&M, 2019) | |
| 1. Clothing collection |
|
| 2. Debris and foreign material collection |
|
| 3. Observation of skin surfaces |
|
| 4. Oral and buccal specimens |
|
| 5. Blood and urine specimens |
|
| 6. Head hair combings and head hair controls |
|
| 7. Additional swabs |
|
| 8. Fingernail swabs |
|
| 9. Pubic hair combings |
|
| 10. External genitalia swabs |
|
| 11. Orifice swabs (vaginal/cervical/rectal) |
|
Preserving Sample Integrity and Security
In order to preserve the integrity of the samples:
- Maintain the individuality of the sample. Preserve each sample separately to avoid contamination. Individual samples for a single case are to be separated, as are samples taken from multiple cases. Maintaining a physical boundary between simultaneous evidence-collection processes among more than one patient in a busy emergency department will reduce the likelihood of a mix-up. A nurse should never simultaneously collect evidence from more than one patient, since cross-contamination could occur and jeopardize any criminal case. Only exhibits from a single case are to be packed together in an external container (TXDPS, 2017).
- Label each sample. All evidence should be labeled with the patient’s name, date of birth, and identifier number; description of the contained evidence and where it was recovered; and the examiner’s initials, date, and time (Texas A&M, 2019). In addition, any evidence containing blood or other body fluids must be labeled as a biohazard. Glass or other sharp objects should also be identified on the outside of the container.
- Maintain evidence security. Collected evidence should remain in plain view of the nurse or in an established location in the emergency unit. Never leave evidence unattended and accessible to tampering. Document custody transfer to the police on the appropriate forms when releasing the SAEK and clothing to law enforcement.
Detailed instructions for preparing and sealing a nonreport SAEK for mailing are included in the Texas Evidence Collection Protocol (see “Resources” at the end of this course).
CHAIN OF CUSTODY
The chain of custody is a process used in forensic evidence collection that provides accurate information about who collected and transported physical evidence. A good chain of custody preserves the evidence against possible contamination or tampering. This process tracks the places the evidence has been kept and the people who have had contact with the evidence, in chronological order. The nurse assures that the evidence has been secure throughout the process of obtaining, labeling, packing, sealing, and processing in order to be defensible in the criminal justice system.
The chain of custody documentation includes:
- Receipt
- Storage
- Transfer of evidence
- Printed name and signature of each person in possession of and transferring or receiving custody
(Texas A&M, 2019)
EVIDENCE STORAGE
Biological evidence may need to be stored before shipment to a crime laboratory for analysis. Check with the local crime lab for specifics. Follow these basic guidelines for storing biological specimens:
- Completely dry wet or moist items before packaging them in a sterile and secure environment. If items cannot be completely dried before the exam is finished, refrigerate as soon as possible.
- Package in paper, not plastic. Plastic is nonporous and therefore allows for moisture retention, resulting in possible growth of bacteria, mold, and/or mildew.
- Refrigerate sexual assault kits. The refrigerator should be locked or located in a locked room that is dedicated to evidence storage.
- If in doubt about how to store biological evidence, refrigerate it while awaiting further instructions or transport.
(TXDPS, 2017)
Photographic Evidence
Photographs can be an important part of forensic evidence and may be used in some legal proceedings to demonstrate physical findings. Facilities must have policies in place to guide collection and appropriate secure storage of digital images, and written informed consent must be obtained prior to taking photographs.
Patients have the right to know how photographs will be stored and utilized and should be reassured that photographs are for medical forensic purposes only. Patients may decline the use of photography (DOJ, 2016).
Personal photography equipment/phones are not used because chain of custody and confidentiality of photographs cannot be maintained.
Basic photographic guidelines include:
- Take a picture of the patient’s demographic information (name, date of birth, age, etc.). A hospital-generated patient label works well for this purpose. This photo should be the first photo of the series and serves to identify the set of photographs. A professional color card may also be considered if color quality of photos is questioned later.
- Whenever possible, include a photo of the patient’s face as the second photo in order to establish identity. This will help the examiner recall the patient at a later time if the case goes forward.
- In the photo of an injured area, always include an object of measurement (a scale) such as a ruler, paper measuring tape, or swab wrapper with centimeters printed on the side. Photograph the injury with and without the scale.
- Take a series of three photos for each injury: 1) a regional photo to show the anatomic location (e.g., middle of the back, right shoulder, etc.); 2) medium range photo, capturing a closer view of the injury; and 3) close-up of the injury. Each close-up of the injury should be photographed with and without a scale beside it (Texas A&M, 2019).
- Include a written report that describes the findings depicted in the photographs. Add a notation that states who took the photos, what type of camera was used, and details such as the magnification used.
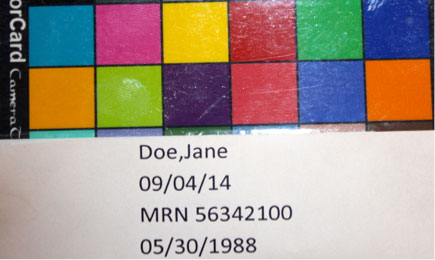
Photo of patient demographic information and color card. (Source: Sheree Goldman.)
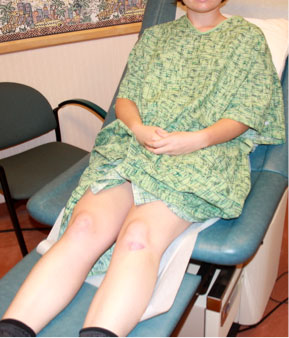
A regional photo depicts an abrasion on the patient’s left knee. (Source: Sheree Goldman.)
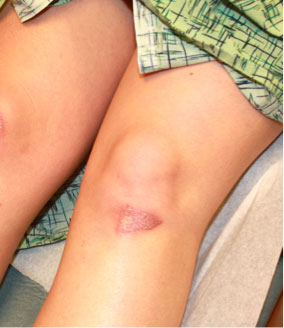
A medium-range photo shows the abrasion on the left knee. (Source: Sheree Goldman.)
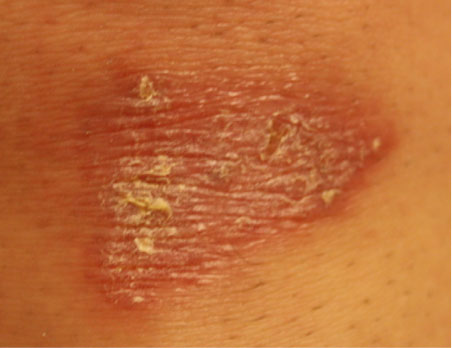
A close-up photo of the abrasion without a scale. (Source: Sheree Goldman.)
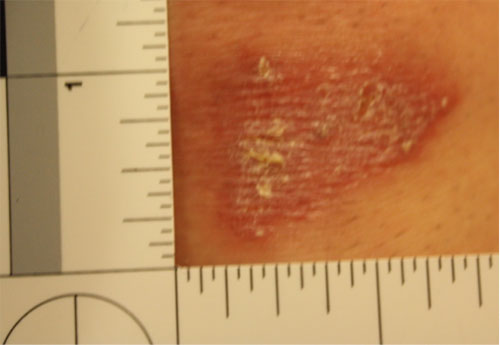
A close-up photo of the same abrasion with a scale. (Source: Sheree Goldman.)
Clothing Evidence
The clothing worn by an individual often contains physical or biological evidence that must be preserved. If the patient is still wearing the clothes they had on during the event, all items can be considered evidence. If the patient has changed their clothes, the nurse should collect the underpants that the patient wears to the exam since transfer of internal evidence from a sexual assault may be present on the fresh underpants. Examine the patient’s clothing and document any obvious stains or tears (Texas A&M, 2019).
Clothing evidence is gathered and packaged for further evaluation as described below:
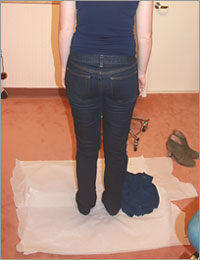
- Begin by covering the floor with a layer of exam table paper or a folded hospital sheet. The purpose of this bottom layer is to prevent collecting evidence from the emergency department floor; this layer will not be collected. When collecting wet evidence, a waterproof pad may be used as a bottom layer.
- Cover with another layer of paper. A large paper sheet for this purpose is found in some SAEKs, or exam table paper may be used. This layer will catch any debris that may fall from the patient’s clothing, such as hair, vegetation, etc., and will be folded into a bindle and collected after the patient has undressed. If the patient has many clothing items, this area will need to be fairly large.
- Have the patient slip off their shoes and step directly onto the paper with bare or stocking feet.
- The patient may remove clothing from the top of the body first and drop it onto the paper below. After the patient has removed all of the clothing from the top of the body, they can dress in a hospital gown and then remove the clothing from the lower part of the body, following the same process.
- Using a clean pair of gloves for each item of clothing, inspect the clothing for tears and stains. Place a hospital sticker on the item of clothing after marking the sticker with the time the clothing was collected and the nurse’s initials.
- Package each article of clothing separately. Be sure to seal the bag with tape over the edge of all openings. Write the time, date, and nurse’s initials across the seal. Mark the bag with the patient’s name, what clothing is in the bag, any information about the clothing, who collected it, and when it was collected.
- After the clothing is collected, be attentive to any debris that might be shaken from the clothing. This material should be packaged as trace evidence. Be careful to keep items separated for packaging.
- Fold the top layer of paper, if debris is visible, into a bindle. Label with the patient’s name and the collector’s initials, and package in a separate clean paper evidence bag as described for clothing above.
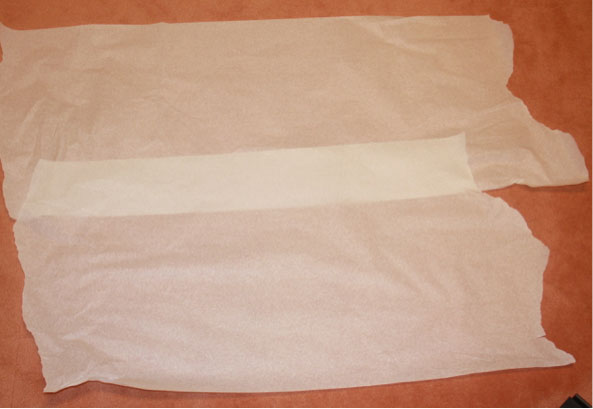
Bottom layer of paper. (Source: Sheree Goldman.)
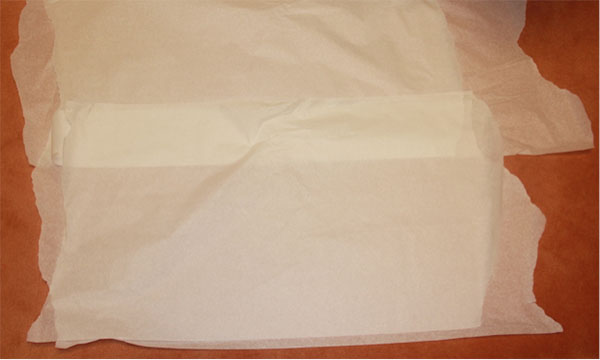
Second layer of paper. (Source: Sheree Goldman.)
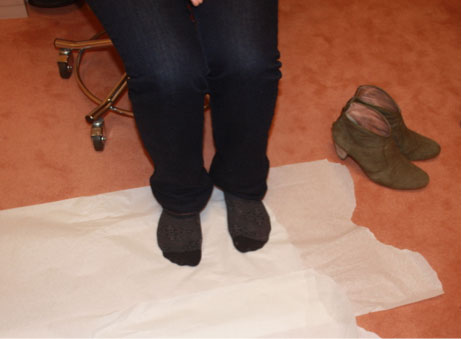
Patient stepping on paper with stocking feet. (Source: Sheree Goldman.)
Patient beginning to disrobe and dropping articles of clothing onto the paper. (Source: Sheree Goldman.)
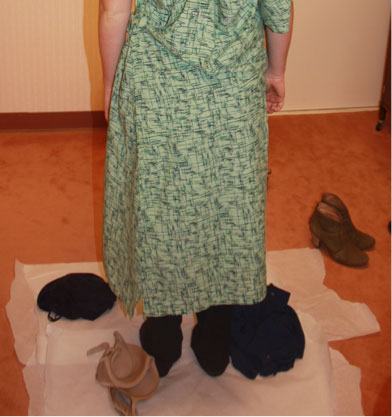
Patient donning hospital gown and continuing to drop articles of clothing onto the paper. (Source: Sheree Goldman.)

Nurse labeling articles of clothing. (Source: Sheree Goldman.)
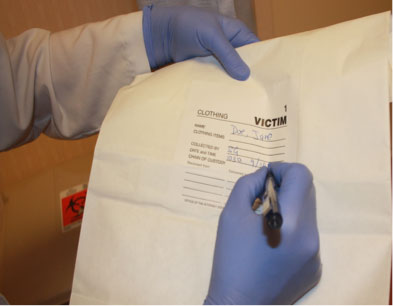
Nurse labeling the bag. (Source: Sheree Goldman.)
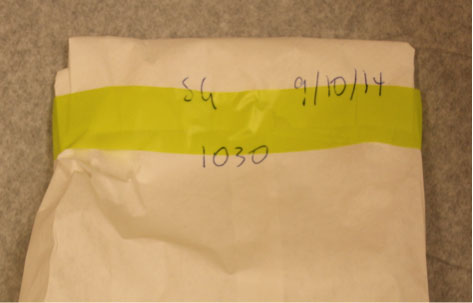
Sealed bag with nurse’s initials, date, and time written across the seal. (Source: Sheree Goldman.)
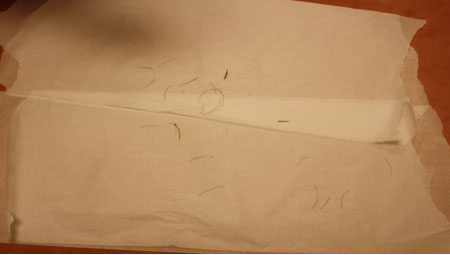
Trace evidence (hair) that has fallen from the patient’s clothing onto the paper. (Source: Sheree Goldman.)
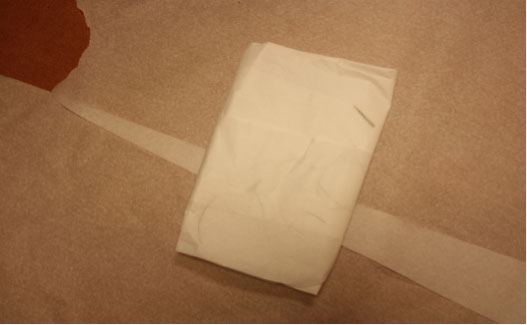
Folded paper bindle.
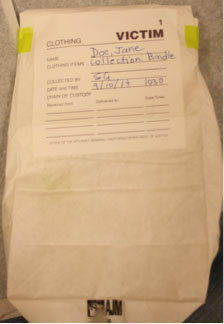
Evidence packaged in a paper bag and properly labeled. (Source: Sheree Goldman.)
To avoid transferring evidence from one piece of clothing to another, place each piece of clothing in a separate evidence bag. Only the underwear is sealed in the SAEK. Air dry any wet clothing before packaging, and use paper evidence bags. If it is not possible to dry the clothing, refrigerate as soon as possible (Texas A&M, 2019).
Collecting Other Evidence
Other evidence may include hair, fibers, and foreign material such as leaves, dirt, sand, or glass. This evidence can create a link between a victim, a suspect, and a crime scene and may be important for law enforcement in piecing together what has happened.
HAIR
Hair is present in a wide variety of forensic situations. For instance, during an assault, hairs may transfer from one individual to another.
Use an evidence comb from the SAEK, and place a paper towel under the patient’s head or buttocks to collect the loose hairs that result from the combing. Include the comb, paper towel, and any hairs that are collected in a bindle, which is sealed in an envelope that is appropriately labeled and sealed. If foreign hairs are collected, control hairs from the patient may be collected by cutting and sealing in an envelope that is appropriately labeled and sealed. Pulling hairs is no longer recommended (Texas A&M, 2019).
FINGERNAILS
Fingernails may contain foreign DNA in the event the patient describes scratching the suspect. It may also contain DNA from the victim or trace evidence such as fiber, dirt, or vegetation. Lightly moisten two small swabs with sterile water, and swab under and around the fingernails, holding both swabs together. Use one set of swabs for each hand, swabbing all five fingers on each hand with the same two swabs (Texas A&M, 2019).
DEBRIS
Bindle any other debris (e.g., tape residue, vegetation, sand, glitter) and place in an envelope that is labeled with the collection site and description. Seal the envelope with the examiner’s initials and place in the SAEK (Texas A&M, 2019).
TOXICOLOGY
The TECP suggests collecting urine when a toxicology study is indicated, such as in cases that include drug-facilitated sexual assault. Urine should be frozen or refrigerated. Document in the medical record any toxicology specimens obtained. Label specimen containers and document the exact collection time. Although blood can also be used for toxicology, it is no longer recommended because of the instability of storing and transporting liquid in glass vials (Texas A&M, 2019).
PROVIDING PROFESSIONAL SUPPORT AND REFERRAL
A traumatized patient will most likely need professional support beyond what can be provided in the emergency department. Sexual assault victims, in particular, have increased risk of posttraumatic stress disorder, depression, anxiety, substance abuse, eating disorders, and suicidal thoughts (RAINN, 2020). All traumatized patients, then, should be linked with resources to attend to their psychological distress.
Printed information about confidential counseling and crisis intervention sources should be made available to the patient and/or family. They are often unable to digest and respond to large amounts of information and direction in the initial period after the trauma. The nurse may offer to contact outside services directly to set up a first appointment. By offering options and promoting informed decision-making, the patient is assisted through the early stages of their crisis (USDOJ, 2013).
CASE
Julie, 20, arrives to the emergency department at 9 a.m. She self-reports that she thinks she was sexually assaulted at a party the night before. She is well-groomed and picking on her fingernails.
Julie explains to the nurse that she doesn’t remember much about the incident except for a flashback of seeing a naked man hovering over her on a sofa. She had been drinking and thinks there might have been something put in her drink. She showered and ate breakfast that morning before coming to the hospital.
The nurse asks if Julie has notified law enforcement. Finding that she has not, the nurse obtains Julie’s permission to have an officer come to the emergency department to take a statement. The nurse also calls a certified rape crisis counselor to the hospital to provide support and asks Julie if there is anyone else she would like to contact.
The nurse informs Julie that she can collect basic evidence at the hospital or arrange for Julie to be seen by a certified Sexual Assault Nurse Examiner at a center 100 miles away. Julie chooses to remain at the hospital and signs a consent for a forensic exam. The nurse obtains a detailed history from Julie in a private exam room, being sensitive to let Julie lead the discussion. The nurse documents the history using as many of Julie’s own words as possible.
Even though Julie has changed her clothing since the assault, the nurse collects and packages Julie’s underwear for evaluation. The nurse performs a head-to-toe evaluation of Julie, looking for injury and any biological or physical evidence for collection. Julie has a bite mark on her right shoulder and bruising on both her upper arms and ankles. The nurse carefully documents these on the body diagram and, with permission from Julie, photographs them. The nurse swabs the bite mark area with two lightly moistened swabs held together in case saliva is remaining on the skin surface.
Once the physical examination is complete, the nurse explains to Julie the need for a body orifice examination in order to collect potential biological evidence. The nurse arranges for the physician to assist with the speculum portion of the exam. The nurse proceeds according to the Texas protocol, collecting swabs and packaging them in swab boxes and envelopes from the sexual assault evidence kit (SAEK). The nurse keeps the evidence in view until the evidence collection process is completed, and then seals the SAEK.
The full forensic examination and specimen collection takes around two hours. Julie is also offered the option to undergo lab work and obtain medications to prevent pregnancy and sexually transmitted infections, following CDC guidelines. The nurse reviews several crisis intervention options for Julie, provides her with written materials, and calls to make her an appointment with a counselor in three days.